on
End to End Deployment on GCP
Table of Contents
- Disclaimer
- Introduction
- Assumptions
- Architecture
- Create a Project
- Enable APIs
- Create VPC
- Create Subnets
- Create Firewall Rules
- Create Private connection to DBs
- Create NAT Router
- Create DB
- Populate env vars
- Push container to gcr
- Create Instance Template
- Create Managed Instance Group (MIG)
- Create IPv4/IPv6 address
- Create Backend Service
- Setup Load Balancer
- Cleanup
Disclaimer
This tutorial is provided “as-is” without any representation or warranties, express or implied. Any reliance you place on this tutorial is strictly at your own risk.
Introduction
This post is about deploying a project on the Google Cloud Platform (GCP). While there is extensive documentation from Google on the use of GCP, I found there to be lacking a single tutorial that built/deployed a project end-to-end. This tutorial aims to close that gap. Everything in this tutorial can be performed on the cli using only the gcloud command.
Assumptions
The following assumptions are made in this post:
- You have an account on the Google Cloud Platform
- You have installed and configured the gcloud tool
- You have enabled billing in GCP
- You have a free Docker Hub account
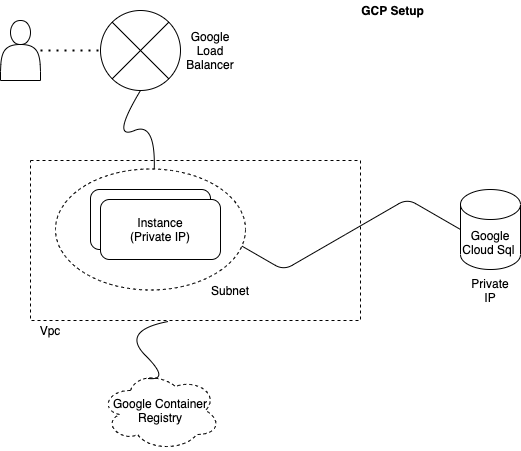
Architecture
We will set up an end-to-end deployment for a fictional company called Acme Corp. We will run a docker container on a group of machines that is able to talk to a DB i.e. A typical CRUD setup.
The convention we will follow in this tutorial when naming resources is acme-{environment}-{resource type}[-{resource name}]. It can be represented via the following diagram:
Create a Project
Create a new project and set this newly created project as the default. Since the project ID/number are unique across google cloud, i’ll be adding today’s date next to it to make it unique. Change it for yourself as appropriate.
gcloud projects create acme-project-09102020
gcloud config set project acme-project-09102020
Verify that your project was created:
gcloud projects list
At this point if you want to enable any third party apps e.g. for sending emails, then head to the Google Marketplace and enable it.
Enable APIs
Enable any service APIs you think you will need. You will need to go to your project and enable billing first. A representative sample is shown below. (Would not hurt to set the default zone/region as well.)
gcloud services enable compute.googleapis.com
gcloud services enable servicenetworking.googleapis.com
gcloud services enable containerregistry.googleapis.com
gcloud services enable storage.googleapis.com

gcloud compute project-info add-metadata \
    --metadata google-compute-default-region=us-west1,google-compute-default-zone=us-west1-a
Confirm it worked:
gcloud services listCreate VPC
gcloud compute networks create acme-prod-vpc \
    --subnet-mode=custom \
    --bgp-routing-mode=regional
Confirm it’s there:
gcloud compute networks list
Create Subnets
We will create only one subnet. The CIDR 10.0.0.0/20 can accommodate 4094 hosts, so you should be fine. The flag enable-private-ip-google-access is needed to connect to the container registry which houses our docker container.
gcloud compute networks subnets create acme-prod-subnet-web \
    --network=acme-prod-vpc \
    --range=10.0.0.0/20 \
    --region us-west1 \
    --enable-private-ip-google-access
Confirm it’s there:
gcloud compute networks subnets list
Create Firewall Rules
By default GCP blocks all incoming traffic and allows all outgoing traffic. We need to add a few more rules to make things function properly.
Allow SSH into the boxes you will set up:
gcloud compute firewall-rules create acme-prod-fw-allow-ssh --network acme-prod-vpc --allow tcp:22,icmpAllow all egress traffic:
gcloud compute firewall-rules create acme-prod-fw-allow-egress --network acme-prod-vpc --direction egress --action allow --rules all --destination-ranges 0.0.0.0/0Allow traffic within the subnet:
gcloud compute firewall-rules create acme-prod-fw-subnet-web-allow-internal-network --allow tcp:1-65535,udp:1-65535,icmp --source-ranges 10.0.0.0/20 --network acme-prod-vpc
Allow health checks from the load balancer (which when created in later steps will send traffic to our nodes):
gcloud compute firewall-rules create acme-prod-fw-allow-health-check-proxy \
--network=acme-prod-vpc \
--action=allow \
--direction=ingress \
--source-ranges=130.211.0.0/22,35.191.0.0/16 \
--rules=tcp:80,tcp:443
Create Private connection to DBs
Since we will be launching a google cloud postgres DB, we should enable vpc peering b/w our network and the managed service one:
gcloud compute addresses create google-managed-services-acme-prod-vpc \
    --global \
    --purpose=VPC_PEERING \
    --prefix-length=16 \
    --network=acme-prod-vpc

gcloud services vpc-peerings connect \
    --service=servicenetworking.googleapis.com \
    --ranges=google-managed-services-acme-prod-vpc \
    --network=acme-prod-vpc \
    --project=acme-project-09102020
Create NAT Router
Our instances will have only private IPs, so they need a way to access the internet:
gcloud compute routers create acme-prod-nat-router-us-west1 \
    --network acme-prod-vpc \
    --region us-west1

gcloud compute routers nats create acme-prod-nat-config \
    --router-region us-west1 \
    --router acme-prod-nat-router-us-west1 \
    --nat-all-subnet-ip-ranges \
    --auto-allocate-nat-external-ips
Create DB
We will be using the google hosted cloud DB (postgres). So let’s go ahead and create one. It will have only a private IP (modify the memory/cpu as you see fit):
gcloud beta sql instances create prod1 --database-version=POSTGRES_12 --cpu=1 --memory=4GB --zone=us-west1-a --storage-size=10 --network=acme-prod-vpc --no-assign-ip
Let’s setup a password for the postgres DB:
gcloud sql users set-password postgres --instance=prod1 --password=mysecretpassword
You can verify that your DB was created via:
gcloud sql databases list --instance=prod1
Populate env vars
We will be running our app in a docker container. We will be using env vars to send in config related info into the container. Lets create a dummy env var file called prod.env. This should not be checked into source control as it probably has things like credentials etc. A sample prod.env would look like:
FOO=BAR
BAZ=QUX
Push container to gcr
This is the container we are actually deploying i.e. our app. For this example we will deploy a simple nginx app that listens on a port that displays a welcome message. Assuming you are logged into your docker hub account:
docker pull nginx
docker tag nginx gcr.io/acme-project-09102020/nginx:0.0.1
Test that it works by:
docker run -it --rm -d -p 80:80 --name web gcr.io/acme-project-09102020/nginx:0.0.1
Then go to http://localhost/ and you should see a “welcome to nginx” message.
Now that we have confirmed that this image works, lets push this to our gcr account:
gcloud auth configure-docker
docker push gcr.io/acme-project-09102020/nginx:0.0.1
Create Instance Template
We will be using a template to create our instances. This ensures that our instances are identical copies of each other. Remember that once created a template cannot be changed. If you want to make a change e.g. a new version of the container etc, create a new template.
gcloud compute instance-templates create-with-container acme-web-vm-0-0-1 \
--container-image=gcr.io/acme-project-09102020/nginx:0.0.1 \
--scopes=default,storage-full \
--machine-type=e2-standard-2 \
--boot-disk-size=250GB \
--subnet=acme-prod-subnet-web \
--container-env-file=prod.env \
--container-stdin \
--container-tty \
--no-address \
--tags=prod,acme-prod-allow-hc-and-proxy, \
--labels=version=0-0-1 \
--region us-west1
Create Managed Instance Group (MIG)
Now we create a managed instance group based on the template we just created (you can modify the number of instances as you see fit):
gcloud compute instance-groups managed create acme-web-1 \
    --base-instance-name acme-web-1-vm \
    --size 1 \
    --template acme-web-vm-0-0-1 \
    --zone us-west1-a
After a while the you can verify that your instances are up and even ssh into them if you like via:
gcloud compute instances list
gcloud compute ssh <instance-name>
If you ssh in, you should see a message something like below to confirm that the instance came up fine and so did the docker container.
  ########################[ Welcome ]########################
  #  You have logged in to the guest OS.                    #
  #  To access your containers use 'docker attach' command  #
  ###########################################################

jimmyjohn@acme-web-1-vm-sl94 ~ $ docker ps
CONTAINER ID        IMAGE                                                                COMMAND                  CREATED             STATUS              PORTS               NAMES
59b3fc9607f9        gcr.io/stackdriver-agents/stackdriver-logging-agent:0.2-1.5.33-1-1   "/entrypoint.sh /usr…"   6 minutes ago       Up 6 minutes                            stackdriver-logging-agent
1d4b2272642e        gcr.io/acme-project-09102020/nginx:0.0.1                             "/docker-entrypoint.…"   6 minutes ago       Up 6 minutes                            klt-acme-web-vm-0-0-1-ipev
jimmyjohn@acme-web-1-vm-sl94 ~ $
Note that these instances will not have any public IPs, only private ones.
Create IPv4/IPv6 address
In order to have a load balancer forward traffic to these instances, we need to create some IP addresses:
gcloud compute addresses create acme-prod-lb-ipv4 \
    --ip-version=IPV4 \
    --global

gcloud compute addresses create acme-prod-lb-ipv6 \
    --ip-version IPV6 \
    --global
Create Backend Service
We need to add a backend service so that we can attach it to a load balancer.
gcloud compute health-checks create http acme-http-basic-check \
    --port 80

gcloud compute instance-groups unmanaged set-named-ports acme-web-1 \
    --named-ports http80:80 --zone us-west1-a

gcloud compute backend-services create acme-prod-web-backend-service \
    --global-health-checks \
    --protocol=HTTP \
    --port-name=http80 \
    --health-checks=acme-http-basic-check \
    --global

gcloud compute backend-services add-backend acme-prod-web-backend-service \
    --balancing-mode=UTILIZATION \
    --max-utilization=0.8 \
    --capacity-scaler=1 \
    --instance-group=acme-web-1 \
    --instance-group-zone=us-west1-a \
    --global
Setup Load Balancer
We now create a url map and attach it to a load balancer:
gcloud compute url-maps create acme-url-map \
    --default-service acme-prod-web-backend-service

gcloud compute target-http-proxies create acme-prod-http-lb-proxy \
    --global \
    --url-map acme-url-map \
    --global-url-map

gcloud compute forwarding-rules create http-ipv4-content-rule \
    --address=acme-prod-lb-ipv4 \
    --global \
    --target-http-proxy=acme-prod-http-lb-proxy \
    --ports=80

gcloud compute forwarding-rules create http-ipv6-content-rule \
    --address=acme-prod-lb-ipv6 \
    --global \
    --target-http-proxy=acme-prod-http-lb-proxy \
    --ports=80
At this point if you go to the IPv4 address(gcloud compute addresses list), you should see your service up and running. You should give the load balancer 5 to 10 minutes to provision, before checking:
$gcloud compute addresses list

NAME                                    ADDRESS/RANGE       TYPE      PURPOSE      NETWORK        REGION    SUBNET  STATUS
acme-prod-lb-ipv4                       35.244.175.20       EXTERNAL                                                IN_USE
acme-prod-lb-ipv6                       2600:1901:0:ee66::  EXTERNAL                                                IN_USE
You can now visit the site at the IP. Also confirm that the docker container has the env vars we sent in present. Ideally you would put in the private IP of the DB in it, so it’s available to the container.
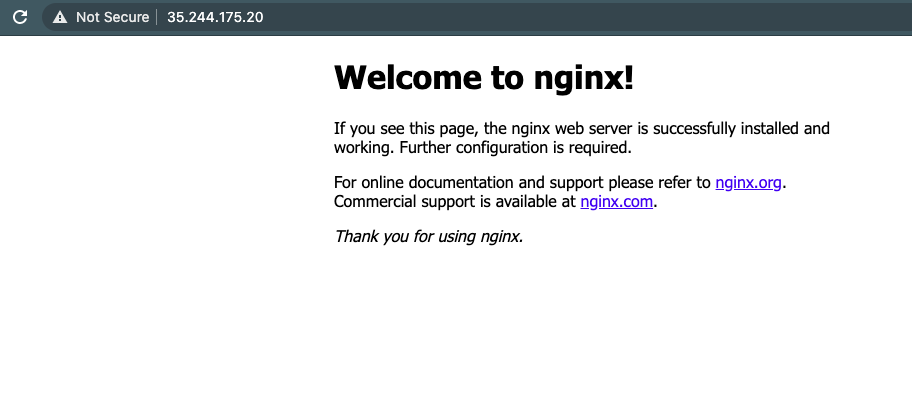
Boom !
Cleanup
In order to clean up everything you just did and no longer incur any changes, delete the project.
Console > Dashboard > [select your project] > Project Settings > Shut Down